Logging into PERUN Supercomputer
Introduction
This guide explains how to connect to the PERUN supercomputer using SSH (Secure Shell). You can access PERUN through a terminal-based SSH client or via the web-based Open OnDemand interface.
Prerequisites
Before logging in, ensure you have: - A valid PERUN account with username and password - SSH key pair properly configured (see SSH Keys documentation) - SSH client installed on your computer
1. Connection Methods Overview
PERUN offers two primary methods for remote access:
| Method | Description | Best For |
|---|---|---|
| SSH Client | Terminal-based command-line access | Advanced users, scripting, automation |
| Open OnDemand | Web-based graphical interface | Beginners, file management, interactive apps |
This guide focuses on SSH client connections. For Open OnDemand instructions, please refer to the dedicated Open OnDemand documentation.
2. Connecting via SSH Client
2.1 Available Login Nodes
PERUN provides two login nodes for redundancy and load balancing:
| Hostname | Description |
|---|---|
login01.perun.tuke.sk |
Login node 1 |
login02.perun.tuke.sk |
Login node 2 |
Connection Recommendation
You can connect to either login01.perun.tuke.sk or login02.perun.tuke.sk. Both nodes provide identical access to the cluster resources.
2.2 Linux, macOS, and Modern Windows
Modern operating systems (Linux, macOS, Windows 10/11) include a built-in SSH client accessible through the terminal.
Basic Connection Command
Open your terminal and enter:
Parameters explained:
- username - Replace with your PERUN username
- login01.perun.tuke.sk - PERUN login server address
- -i /path/to/private_key - Path to your private SSH key file
Example
Connecting to Alternative Login Node
You can also connect to the second login node:
2.3 First-Time Connection
When connecting for the first time, you may see a security warning:
The authenticity of host 'login01.perun.tuke.sk' can't be established.
ED25519 key fingerprint is SHA256:...
Are you sure you want to continue connecting (yes/no/[fingerprint])?
Response: Type yes and press Enter to add the server to your known hosts.
Security Note
This message appears only on your first connection. If you see it on subsequent connections, contact PERUN support as it may indicate a security issue.
Multiple Host Keys
You will need to accept the host key for each login node separately when connecting for the first time.
3. Windows-Specific SSH Clients
While Windows 10/11 includes a native SSH client, some users prefer graphical alternatives.
3.1 MobaXterm (Recommended)
MobaXterm is a feature-rich SSH client with integrated X11 server and tabbed interface.
Connection Steps:
- Launch MobaXterm and click the Sessions button in the top menu
- Select SSH from the session types
- Configure connection settings:
- Remote host:
login01.perun.tuke.sk - Username: Your PERUN username
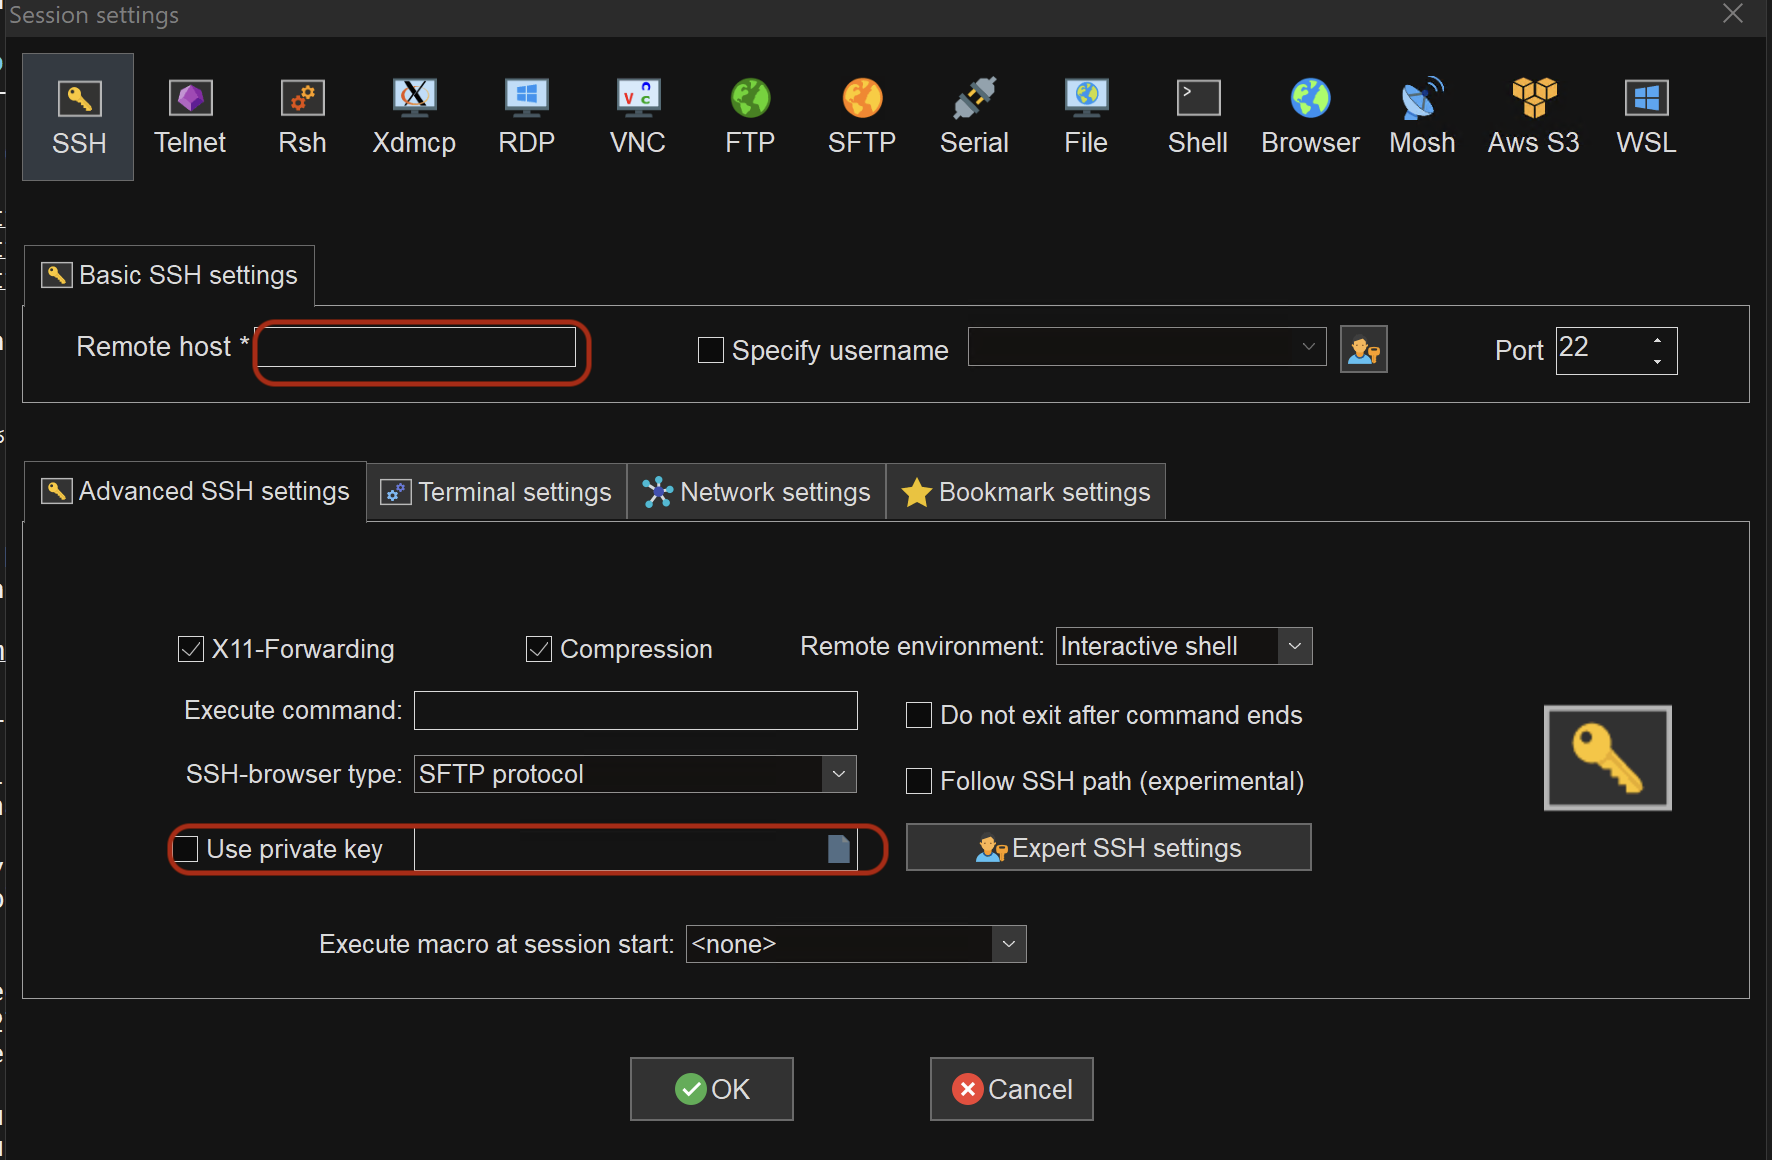 Figure 1: MobaXterm session configuration showing the Remote host field and SSH session type
- Configure SSH key authentication:
- Navigate to Advanced SSH settings tab
- Check the Use private key option
- Click the folder icon to browse for your private key
-
Select your private key file (e.g.,
id_rsa) -
Save and connect:
- Click OK to save the session
- Double-click the saved session to connect
Session Management
MobaXterm saves your sessions for quick reconnection. You can organize them into folders for better management. Create separate sessions for login01 and login02 if you want to have both nodes readily accessible.
3.2 PuTTY
PuTTY is a lightweight, traditional SSH client for Windows.
Connection Steps:
- Launch PuTTY
- Configure basic session:
- Go to Session category
- Host Name:
login01.perun.tuke.sk(orlogin02.perun.tuke.sk) - Port:
22 - Connection type: SSH
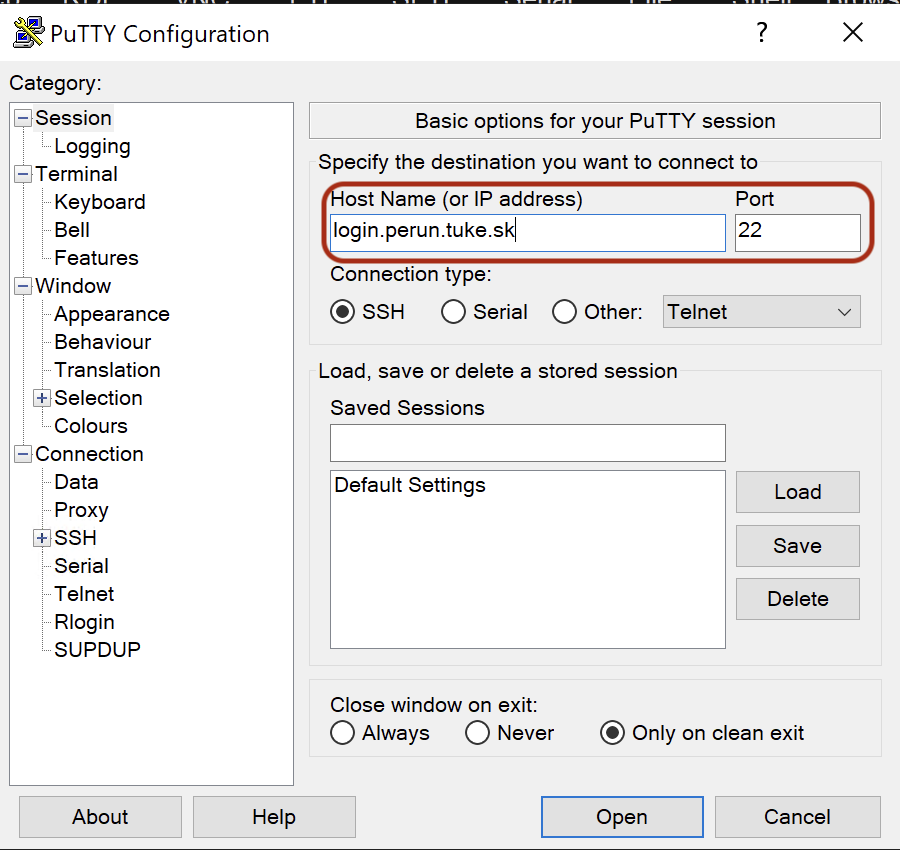 Figure 2: PuTTY main window showing Host Name and Port configuration for PERUN connection
- Configure SSH key authentication:
- In the left panel, expand Connection → SSH → Auth
- Click on Credentials
- Click Browse under "Private key file for authentication"
- Locate and select your private key file (must be in
.ppkformat)
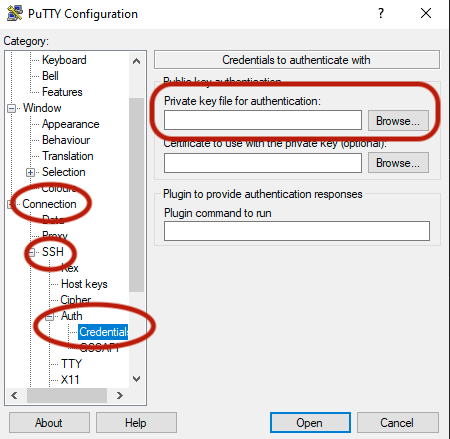
Figure 3: PuTTY SSH authentication settings showing where to specify the private key file
- Save session (optional but recommended):
- Return to Session category
- Enter a name in "Saved Sessions" (e.g., "PERUN-login01", "PERUN-login02")
-
Click Save
-
Connect:
- Click Open to establish connection
PuTTY Key Format Requirement
PuTTY requires SSH keys in .ppk format. If your key was generated in OpenSSH format (Linux, macOS, or Windows command line), you must convert it using PuTTYgen.
Converting OpenSSH Keys to PuTTY Format
If you have an OpenSSH private key (e.g., id_rsa), convert it to PuTTY format:
- Launch PuTTYgen (included with PuTTY installation)
- Load your OpenSSH key:
- Click Load button
- Change file filter to "All Files (.)"
- Select your OpenSSH private key file
- Enter passphrase if prompted
- Save in PuTTY format:
- Click Save private key
- Choose a filename (e.g.,
perun_key.ppk) - Save the file
- Use the
.ppkfile in PuTTY's authentication settings
4. Troubleshooting Common Issues
4.1 Connection Refused
Problem: Connection refused error when attempting to connect.
Solutions:
- Check your network connection
- Ensure you're not behind a firewall blocking SSH connections
- Verify the hostname is correct: login01.perun.tuke.sk or login02.perun.tuke.sk
- Try connecting to the alternative login node if one is under maintenance
4.2 Permission Denied (publickey)
Problem: Authentication fails with "Permission denied (publickey)" error.
Solutions: - Verify your SSH key is correctly configured - Ensure you're using the correct private key file path - Check that your public key is registered in your PERUN account - Verify the private key has correct permissions:
4.3 Host Key Verification Failed
Problem: Warning about host key mismatch.
Solution:
- DO NOT ignore this warning casually
- Contact PERUN support to verify if the host key has legitimately changed
- If confirmed safe, remove the old key from ~/.ssh/known_hosts:
4.4 Timeout Issues
Problem: Connection times out without establishing.
Solutions: - Check your internet connection - Verify you can reach the server:
- Try connecting to the alternative login node - Contact your network administrator about firewall rules4.5 PuTTY Key Format Error
Problem: PuTTY shows "Couldn't load private key" error.
Solution:
- Your key is likely in OpenSSH format
- Convert it to .ppk format using PuTTYgen (see section 3.2)
4.6 Node Availability Issues
Problem: Experiencing issues connecting to one login node.
Solution: - Try connecting to the alternative login node - Report the issue to PERUN support - Check system status announcements for known issues
5. Security Best Practices
5.1 Key Management
- Never share your private SSH key
- Always use passphrases for private keys
- Keep backups of your keys in a secure location
- Rotate keys periodically (every 6-12 months)
5.2 Connection Security
- Do not use public or untrusted networks without VPN
- Always verify the host key fingerprint on first connection
- Log out properly when finished:
5.3 Private Key Permissions
Ensure your private key has restrictive permissions:
Security Warning
If your private key permissions are too open, SSH will refuse to use it for security reasons.
6. Quick Reference
SSH Command Templates
# Login node 1
ssh username@login01.perun.tuke.sk -i ~/.ssh/id_rsa

# Login node 2
ssh username@login02.perun.tuke.sk -i ~/.ssh/id_rsa
Common Connection Settings
| Setting | Value |
|---|---|
| Login Node 1 | login01.perun.tuke.sk |
| Login Node 2 | login02.perun.tuke.sk |
| Port | 22 |
| Protocol | SSH |
| Authentication | Public key (SSH key) |
MobaXterm Quick Setup
- Sessions → SSH
- Remote host:
login01.perun.tuke.sk(orlogin02.perun.tuke.sk) - Advanced SSH settings → Use private key → Browse to key file
- OK → Connect
PuTTY Quick Setup
- Session → Host Name:
login01.perun.tuke.sk(orlogin02.perun.tuke.sk) - Connection → SSH → Auth → Credentials → Browse to
.ppkkey file - Return to Session → Save → Open
7. Getting Help
If you encounter issues not covered in this guide:
- PERUN Documentation: Check the official documentation at your institution's HPC portal
- Support Email: Contact PERUN support team
- System Status: Check for maintenance announcements